6.4.11 Drone mode (experimental)
6.4.13 Always save current position before
teleport
6.6.6 SAM Support Discord Server
7.2.5 Export Player Informations
7.3 Players /
Teleport – Context menu
7.3.18 Teleport to last position
7.3.19 Destroy Zombies within radius
7.3.20 Destroy Razors within radius
7.3.21 Airdrop on player location
7.3.22 Destroy all payer flags
10.1 "Vehicle list" - Context menu
11.1 Squad member list – Context menu
14.3.1 Configuring incomplete commands
18.2.1 Context menu – Structure view
1 Introduction
This document describes how
Scum Admin Manager (SAM) works. SAM makes the work of scum server
administrators easier. Most of the functions are limited to the administrative
in-game activities in Scum.
2 Preconditions
For most functions it is
mandatory to have administration rights on the Scum Server. In addition, the
user must have started the game Scum and be either in single-player or
multiplayer mode.
For some functions (e.g.
reading your own position) the Steam ID of the user is necessary. This is
automatically read from the Steam installation directory. It is therefore
necessary that the user is logged in to his corresponding Steam account.
The button for calling up the
in-game chat window, if it has not been left in the standard ("T"),
it must be edit (Chapter: Key for Chat).
While SAM sends commands to
Scum, the user should not perform any other activities on the computer.
Otherwise, it can lead to erroneous results.
Scum
should be started in frameless window mode, otherwise it can lead to problems,
e.g. the mode "Always in foreground does not work correctly.
3 Installation
There are some subfolders in the SAM program directory after installation. In these folders, the different "objects" (positions, packages, commands, advertisements, links, log files) are stored. For this reason, it is important that the user has write permissions in the program directory.
These subdirectories already contain some sample files after installation. These files serve as sample files, or provide basic elements, e.g. in the case of the commands. As part of the installation, the user has the option of selecting or deselecting the sample files to be installed.
If no other location was selected during the installation process, the installation takes place in the directory: "C:\Users\<USERNAME>\AppData\Local\Programs\ScumAdminManager".
4 Deinstallation
During an installation, all files/directories provided after installation are removed. An exception are files created by the user after installation. These may then have to be manually removed/moved (saved).
5 Overview
The individual functions are
grouped into tabs on the program interface.
Via the button ![]() the program is terminated without further
action (exception made/changed settings are saved.) (Alternatively Escape
button).
the program is terminated without further
action (exception made/changed settings are saved.) (Alternatively Escape
button).
This ![]() closes the main window and displays a smaller
window instead (standby mode).
closes the main window and displays a smaller
window instead (standby mode).
![]()
This window is always in the
foreground and can be freely positioned by the user over the dotted surface.
If a server to be monitored
has been configured, the server information of Battlemetrics (www.battlemetrics.com) is displayed in addition to the program logo in this window. This
information is also displayed in the main window and is automatically updated
every 2.5 minutes.
With a double click (left
mouse button) on the logo or the server information, the user can switch back
to the main window.
6 Menu bar
Various entries are available in the menu bar at the top of the program window.
![]()
6.1 Log File Viewer
The
button starts the Log File Viewer ![]() (see chapter Log File Viewer)
(see chapter Log File Viewer)
6.2 Economy Manager
The
button ![]() starts the Economy Manager (see chapter Fehler! Verweisquelle konnte nicht gefunden
werden.)
starts the Economy Manager (see chapter Fehler! Verweisquelle konnte nicht gefunden
werden.)
6.3 Json Manager
The
button ![]() starts the Json Manager (see chapter Json
Manager)
starts the Json Manager (see chapter Json
Manager)
6.4 Options
The following entries are available in the menu item "Options".

6.4.1 Language
Via the entry "Language" the user can choose between the languages "German" and "English" (default is English).
![]()
For the correct adoption of the selected language, the program must be restarted.
6.4.2 Battlemetrics
The entry "Battlemetrics" calls the Battlemetrics Scum Server Browser. The user can enter one or more search terms in the "Search" field. The search is carried out via the "Search" button (alternatively via the Enter key).
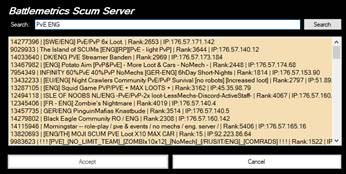
The desired server can then accept the entry by selecting it with the mouse and using the "Apply" button (alternatively double-clicking with the left mouse button on the desired server entry).
The Cancel button closes the Battlemetrics Scum Server Browser without any further action.
![]()
After taking over a server the name of the server is displayed in the submenu of the entry "Battlemetrics". If, or if no server is selected, "none" is displayed at this point.
The current server information (actual number of players / max. number of players | Server rank) are displayed directly in the main window.
![]()
This information is automatically updated every 2.5 minutes.
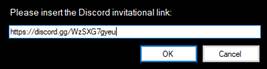
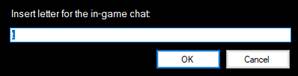
6.4.3 Edit Discord Link
Via the entry "Edit Discord Link" the user can store an invitation link for his Discord server. Discord servers are very often used as an information platform for Scum Servers. The entered Discord link is provided on the "Links" tab and can be copied from there to the clipboard.
After selecting the entry "Edit Discord Link", the input window opens.
6.4.4 Restart Settings
Scum servers are usually restarted regularly. The user can store these restart times in the program via the entry "Restart Settings". This information is used for the Restart Warning feature to calculate the remaining time until the next server restart in minutes.
After selecting the entry "Restart Settings", the input window opens.
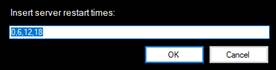
Here the different restart times, separated by a comma and without spaces, must be entered. Only integers from 0 to 24 are allowed.
In the example above, the server restarts at 0:00, 6:00, 12:00, and 18:00.
6.4.5 Command Delay
With the option "Command Delay" you can set the delay for sending the Scum commands to the Scum Chat window (time from sending a command in the SAM to entering it in the Scum Chat window) in milliseconds. The minimum value is 200 milliseconds (minimum 400 milliseconds is recommended). The default value is 800ms).

6.4.6 Key for Chat
Scum's admin commands are issued via the chat window within Scum. The chat window is called up by default via the "T" key. If the user has assigned another button for this purpose, he must enter the button used by him via the entry "Button for chat window". At the current time, only the keys "A to Z" and "0 to 9" are allowed here.
6.4.7 Edit Links
Opens the file for editing the links/shortcuts listed on the "Links" tab in the Windows Notepad (See chapter Links Tab).
6.4.8 Open Program Folder
Opens
the program directory of SAM, e.g. to import or export files.
6.4.9 Open SAM Setting Folder
Opens the settings directory of SAM, e.g. to delete the settings in case of problems (SAM must be closed before deletion.
6.4.10 Open SCUM Folder
Opens the SCUM directory in
the Windows profile of the logged in user.
6.4.11 Drone mode (experimental)
If the user is logged in with the drone on a server, the behavior when sending Scum commands differs and the Scum menu (options, exit game, etc.) is unintentionally displayed. If the drone mode of SAM is activated, this is usually prevented.
At an interval of 30 seconds (v3.4.7), it checks whether the user is currently logged into Scum in drone mode and activates/deactivates the drone mode accordingly.
The activated drone mode is displayed to the user via a golden font in the main and standby windows.
![]()
![]()
6.4.12 Always on Top
The entry "Always on Top" causes the program window to always remain in the foreground. Which option is active is displayed by a checkbox.
![]()
![]()
deactivated activated
6.4.13 Always save current position before teleport
If this option is activated, the current position of the respective player will be saved before each teleportation.
![]()
6.5 Players
The entries in the menu item "Players" can be used to execute the scum commands "Unban" (unban), "Unmute" and "Unsilence" (unmute (for all).
Hint:
The "Unban"
command can only be applied to players who have also been banned with SAM (Scum
command: Ban). The affected players are logged by SAM and entered in
corresponding log files. The reading of banned players from the server
providers (G-Portal, Pingperfect, etc.) is currently not possible.
The players in the log files are listed in the submenus of the respective commands "Unban", "Unmute" and "Unmute (for all)" and can be selected there by the user.
In the case of empty log files, the entry "No player entry!" is displayed in the respective submenu.
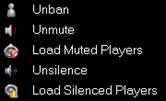
6.5.1 Load muted Players
Players who have been muted by a Scum Administrator (for their own character) can be read by the SAM from the server. This information is then added to the respective log file and is then offered for selection in the submenu of the entry "Unmute".
6.5.2 Load Silenced Players
Players who have been muted by a Scum Administrator (for all) can be read by the SAM from the server. The read information is then added to the respective log file and is then offered for selection in the submenu of the entry "Unmute for all".
6.6 Help
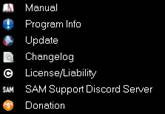
6.6.1 Manual
Retrieves the present documentation of the "Scum Admin Manager" (alternatively F1 key).
6.6.2 Program Info
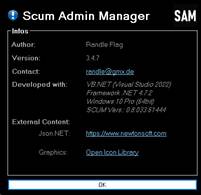
Gets general information about Scum Admin Manager.
6.6.3 Update
This entry can be used to check whether there is a software update for SAM. If this is the case, the update can be downloaded and installed directly.
6.6.4 Changelog
Opens the ChangeLog.pdf file from the program directory.
6.6.5 License / Liability
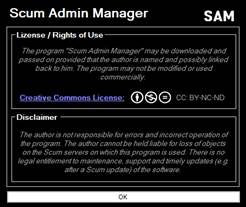
Retrieves information about scum admin manager licensing and liability terms.
6.6.6 SAM Support Discord Server
Opens an invitation link to the SAM Support Discord Server (https://discord.gg/yTVtGWZU7C).
6.6.7 Donation
Opens a website to submit a (voluntary!) Donation (via PayPal) to the program author.
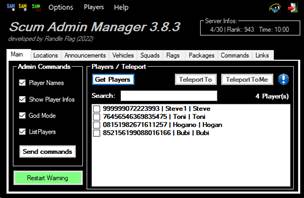
7 Main Tab
The "most important" (or frequently used) commands are located on the "Main" tab.
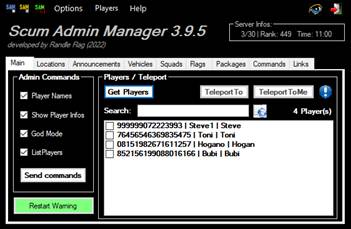
7.1 Admin Commands
The "Admin Commands" section lists the four most important admin commands.
|
|
Befehlsbezeichnung |
Bedeutung |
|
|
Player name |
The player names
are displayed to the admin within the game (above the heads of the other
players). |
|
Player on map |
The position and names of the other players are
displayed to the admin on the map within the game. |
|
|
God Mode |
The admin does
not need any materials to fill blueprints. |
|
|
ListPlayers |
Loads the players currently logged on to the
server, both in-game and into the SAM user interface. |
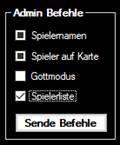
The user can use the checkboxes to select which of the commands should be sent to Scum and how.
|
Checkbox Status |
Bedeutung |
|
|
The command is
not executed or sent to Scum. |
|
|
The command is executed. (Parameter: True) |
|
|
The command is
revoked. (Parameter: False) |
Note:
The Status checkbox is not available for
the "Player List" command. The background is that here the transfer
parameter "True" only ensures that the player list is copied to the
Windows clipboard.![]()
The "Send Commands" button sends the
commands to Scum according to the selection.
The settings are saved permanently.
The "Restart Warning" button generates an
advertisement ("#Announce") within Scum with the remaining time (in
minutes) until the next server restart.
7.2 Players / Teleport
The
"Load Players" button loads the list of players currently logged in
to the Scum server in the list of the user interface. If the "Send
Commands" button in the "Admin Commands" area was previously
pressed in the "Send Commands" area and the "Player List"
option was selected, the player list is automatically loaded.
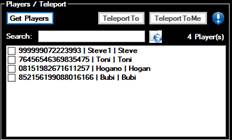
7.2.1 Teleport To
The "Teleport to" button is activated as soon as an entry from the player list has been selected.
After pressing the button, your own character will be teleported to the selected player.
7.2.2 Teleport To Me
The "Teleport to me" button is activated as soon as an entry has been selected from the player list, or one or more players have been selected using the preceding checkbox. If several players are selected here, the selected players will be teleported to their own character in turn.
7.2.3 Player Info
The
button ![]() retrieves the available information about the
selected player. For this purpose, both the information from the player list
and from the squad information are used.
retrieves the available information about the
selected player. For this purpose, both the information from the player list
and from the squad information are used.
If
the squad information has not been read out before (see chapter
Squad Tab), it is read out automatically.
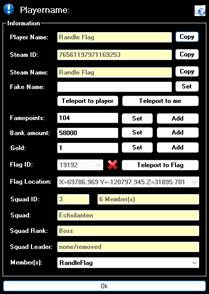
Steam ID has been faked
in this image.
The
Members drop-down list becomes active when the player is a member of a squad
with more than one member. In this case, the user can also call up the player
information of the other squad members here.
Via
the button "Forgive", the number entered in the respective field
(fame points, account balance, gold) can be assigned to the player.
Via
the button "Add", an amount can be added to the respective
"account" (fame points, account balance, gold)
For example, add to
balance ($).
Negative
numbers (e.g. "-1000") can also be entered at this point.
The button ![]() can be used to export the player information
(SteamID, Steam name, player name, fame points, account balances) to a text
file. The text file is saved in the Windows Temp directory and opens
automatically.
can be used to export the player information
(SteamID, Steam name, player name, fame points, account balances) to a text
file. The text file is saved in the Windows Temp directory and opens
automatically.
7.2.4 Search
If there are a lot of
players on a server, it can be tedious to find the right player in the list. To
facilitate this search, the user can enter a string in the "Search"
text field. The player list is then reduced to the player entries that contain
the corresponding string.
7.2.5
Export Player Informations
The button ![]() can be used to export the player information
(SteamID, Steam name, player name, fame points, account balances) of all
players in the list to a text file. The text file is saved in the Windows Temp
directory and opens automatically.
can be used to export the player information
(SteamID, Steam name, player name, fame points, account balances) of all
players in the list to a text file. The text file is saved in the Windows Temp
directory and opens automatically.
7.3 Players / Teleport – Context menu
The context menu in the player list has numerous entries.
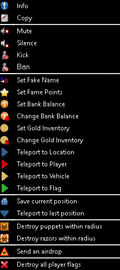
7.3.1 Info
As
described in the chapter "Player Info" ![]() .
.
7.3.2 Copy
Copies
the selected entry to the Windows clipboard.
7.3.3 Mute
Mutes the selected player (only) for their own character in in-game chat.
Hint:
The players muted in this way are not saved on the server side. This means that the sum switching must then
be made explicitly, stating the respective Steam ID. For this purpose, the
players muted with SAM are entered into a log file (see chapter Players.
7.3.4 Silence
Mutes the selected player for all players on the server in in-game chat.
Hint:
The players muted in this way are not saved on the server side. This means that the sum switching must
then be made explicitly, stating the respective Steam ID. For this purpose, the
players muted with SAM are entered into a log file (see chapter).
7.3.5 Kick
Kicks
(removes) the selected player from the server. However, the player can log back
into the server.
7.3.6 Ban
Kicks (removes) the selected player from the server and bans him permanently, or until the ban is lifted. The player cannot log back into the server until the ban is lifted.
Hint:
The players banned with SAM are entered
into a log file (see chapter Players).
7.3.7 Set Fake Name
Set/Change the current fake name of the selected player.
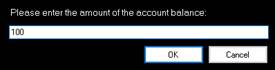
7.3.8 Set Fame Points
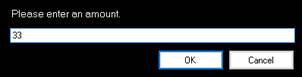
This entry allows the user to change the number of Fame Points of the selected player.
To do this, enter the desired number of fame points in the following dialog and confirm with "OK".

The
Cancel button terminates the process without any further action.
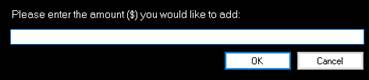
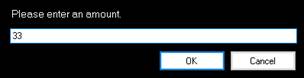
7.3.9 Set Bank Balance
This entry allows the user to change the amount of the bank balance of the selected player.
To
do this, enter the desired number for the amount of the bank balance in the
following dialog and confirm with "OK".
7.3.10 Change Bank Balance
This entry allows the user to change the balance of the selected player.
To do this, enter the desired amount of the account balance in the following dialog and confirm with "OK".
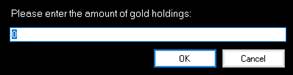
7.3.11 Set Gold Inventory
This entry allows the user to change the amount of the gold inventory of the selected player.
To
do this, enter the desired number for the gold inventory in the following
dialog and confirm with "OK".
7.3.12 Change Gold Inventory
This entry increases the existing gold holdings by the amount entered.
7.3.13 Teleport to Location
Teleports the selected player to one of the locations stored in SAM.
![]()
Note:
The locations shown are exemplary!
7.3.14 Teleport to player
Teleport the selected player to one of the players from the current player list.
![]()
7.3.15 Teleport to Vehicle
Teleports the selected player to a vehicle from the current vehicle list (see chapter Tab – "Vehicles"). The vehicles displayed here can be reduced via the filter on the "Vehicles" tab.Fehler! Verweisquelle konnte nicht gefunden werden.

7.3.16 Teleport to Flag
Teleports the selected player to a flag from the current flag list.
![]()
Steam
ID has been faked in this image.
7.3.17 Save current position
Saves the current position of the selected player.
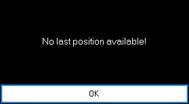
7.3.18 Teleport to last position
Teleports the selected player to their last position. The last position can be saved in a targeted manner, see function "Save current position". If the option "Always save current position before teleporting" has been activated in the options of the SAM, this is done automatically. If no "last" position is saved for the selected player, the user will be notified.
7.3.19 Destroy Zombies within radius
Via the menu entry "Delete zombies in radius x" all zombies in radius x of the selected player can be deleted.
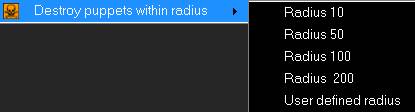
In addition to the 4 predefined radii (10, 50, 100, 200), the user can also specify a user-defined radius.
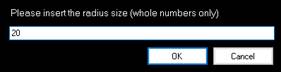
The
specified value is stored by SAM and entered as a suggestion in the input field
the next time this function is called.
7.3.20 Destroy Razors within radius
The menu item "Delete Razors in radius x" can be used to delete all Razors in radius x of the selected player.
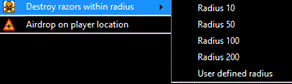
In addition to the 4 predefined radii (10, 50, 100, 200), the user can also specify a user-defined radius.
7.3.21 Airdrop on player location
Create an Airdrop on the position of the selected player.
7.3.22 Destroy all payer flags
This command removes all bases of the selected player.
8 Locations Tab
The tab contains the controls for saving and using saved locations.
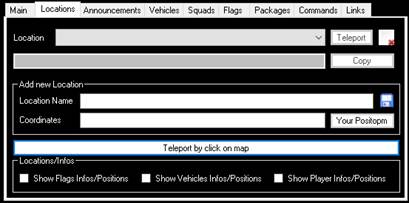
To get to certain positions (event areas, trading places, bunkers, etc.) on the Scum map as quickly and easily as possible, such positions can be stored permanently with SAM.
To do this, enter a name for the new position in the "Add new position" area. Furthermore, the corresponding coordinates are required.
If the user is in the desired position, he can use the "Your position" button. The coordinates of your own character are then read out and entered in the "Coordinates" field.
Alternatively, the user can also copy the coordinates from other sources (e.g.: from one of the numerous interactive scum maps on the Internet).
The ![]() button then saves the new position and is
immediately available in the "Position" drop-down list.
button then saves the new position and is
immediately available in the "Position" drop-down list.
After selecting one of the saved positions from the "Position" drop-down list, the corresponding coordinates are displayed in the user interface. The "Copy" button copies the displayed coordinates to the Windows clipboard for further use.
![]()
With the "Teleport" button, the user can teleport his character to the selected position.
The
button ![]() permanently deletes the selected position.
permanently deletes the selected position.
The files for storing the positions are stored in the subfolder "Locations" of the program directory. The file extension is: "".loc".
The "Teleport by clicking on map" button executes the "#MapTeleport" command.
After activation, the user is ported to the selected position after clicking on the map.
![]()
8.1
Locations/Infos
In the "Locations/Info" area, the user can display various (flags, vehicles, players) locations and information on the in-game map (checkbox selected/activated) or hide (checkbox deselected/deactivated).
![]()
9 Announcements Tab
On the "Announcements" tab, you can permanently save the announcements you need again and again (Scum command: #Announce).
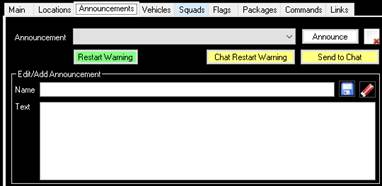
In the "Edit/Add Announcements" section, both new announcements can be created, and existing announcements can be edited.
The
files used to store announcements are stored in the "Announcements"
subfolder of the program directory. The file extension is:
".announce".
9.1 Create Announcements
To
create a new announcement, a name (field: "Name") and the content
(field: "Text") must be entered for the new advertisement. The
"Save" button completes the process. The new announcement is then
immediately available in the "Announcement" drop-down list. The
button ![]() clears the two fields "Name" and
"Text".
clears the two fields "Name" and
"Text".
9.2 Edit Announcement
To do this, one of the existing announcements must first be selected from the selection list.
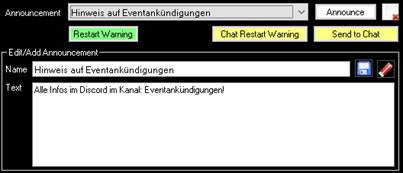
Once selected, the name and text of the announcement is displayed in the Edit/Add Announcements pane. The user can now change the text content of the announcement.
If
the name of the announcement is not changed, the button ![]() overwrites the existing announcement.
overwrites the existing announcement.
If the name of the announcement is changed, a new announcement is created after pressing the "Save" button, unless an announcement with this name already exists.
The
button ![]() permanently deletes the selected
advertisement.
permanently deletes the selected
advertisement.
9.3 Run Announcement
The "Announce" button sends the selected announcement to Scum.
Alternatively, the announcement can also be sent to Scum's in-game chat via the "Send to Chat" button. In this case, no administrator permission is required on the Scum Server.
In
addition, the "Restart Warning" function, which is already known from
the chapter "Tab – "Start", is also available here. This can
also be sent to Scum's in-game chat as an alternative.
10 Vehicle Tab
On
the "Vehicles" tab, the vehicle information of the Scum Server can be
read out and displayed.
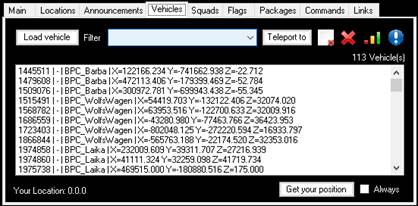
Using the "Filter" drop-down list, the content of the vehicle list can be limited to the selected vehicle type.
The "Teleport to" button teleports the user's character to the selected vehicle.
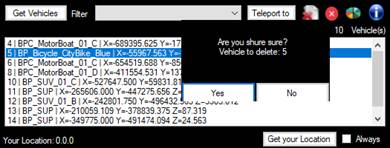
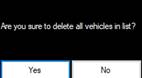
The
button ![]() deletes the selected vehicle from the
server after a security query.
deletes the selected vehicle from the
server after a security query.
The
button deletes ![]() all vehicles that are currently displayed in the
list from the server after a security query.
all vehicles that are currently displayed in the
list from the server after a security query.
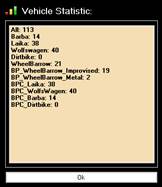
The
button ![]() shows the user an overview of the vehicles
available on the Scum Server.
shows the user an overview of the vehicles
available on the Scum Server.
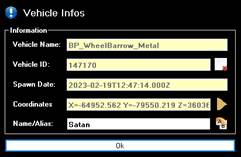
The
button ![]() shows the user the available information of
the selected vehicle.
shows the user the available information of
the selected vehicle.
·
![]() Delete current vehicle.
Delete current vehicle.
·
![]() to current vehicle
to current vehicle
·
![]() Rename current vehicle (aliases)
Rename current vehicle (aliases)
To remove vehicles safely and specifically from the server, it can be useful to know your own position on the Scum map. For this purpose, there is the "Your position" button at the bottom of the "Vehicles" tab. After pressing this button, the user is shown his own position.
Via the checkbox "Always" you can set that your own position is always displayed automatically when the button "Read" or "Teleport to" is pressed.
10.1 "Vehicle list" - Context menu
The
following functions can be executed via the context menu of the vehicle list.
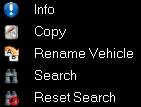
10.1.1 Info
Displays
the available information of the selected vehicle to the user (like above).
10.1.2 Copy
Copies the selected entry to the clipboard. Multiple selection is possible.
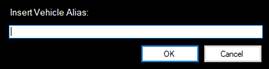
10.1.3 Rename vehicle
It is possible (for administrators) to assign a meaningful name (alias) to the vehicles on the Scum servers. When this entry is pressed, the user can enter the desired name via the subsequent dialog. Multiple selection is possible. If you select multiple times, a counter is added to the name.
10.1.4 Search
Starts a search within the filtered vehicle list. In the subsequent dialog, a search term can be entered (e.g. part of the coordinates).

An active search is indicated to the user
by a different coloring of the name of the filter selection.
![]()
10.1.5 Reset Search
Resets the search.
11 Squad Tab
The Squad tab is used to display the squad information existing on the Scum server.
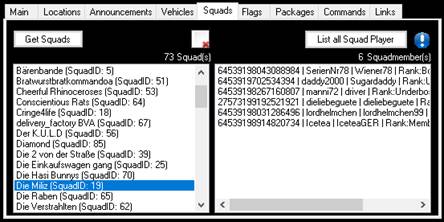
In the left list the squads of the Scum Server are displayed. After selecting one of the squads, the squad members are displayed to the user in the right list.
The
button ![]() deletes the information of the selected squad,
not the squad himself.
deletes the information of the selected squad,
not the squad himself.
If a
squad member is selected in the list on the right, the button ![]() can be used to display the available
information about the selected player. This also requires the information from
the player list of the "Main" tab. If this information has not been
read out before, it is automatically read out before the player information is
displayed.
can be used to display the available
information about the selected player. This also requires the information from
the player list of the "Main" tab. If this information has not been
read out before, it is automatically read out before the player information is
displayed.
The selected entry can be copied to the clipboard via the context menu. In addition, all bases of the selected squad can be deleted.
![]()
Hint:
In contrast to the player information that
is read on the "Home" tab, information about players who are not currently logged on to the Scum server can also be displayed here. However, some
information (e.g. number of fame points) cannot be read.
11.1 Squad member list – Context menu
The following functions are available in the context menu of the list for the squad members.
![]()
11.1.1 Info
Retrieves
the available player information about the selected squad member (see chapter
Player / Teleport – Context Menu, Info).
11.1.2 Ban
The selected player will be permanently removed from the server.
Hint: The
same conditions apply here as in the context menu of the player list on the
"Main" tab.
11.1.3 Set Fame Points
As in the context menu of the player list, the user can also award Fame Points to the selected player in the list of squad members.
12 Tab „Flags“
On the tab "Flags" the flag information of the server can be read and displayed.
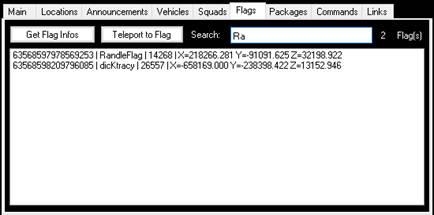
Steam ID has been faked in this image.
Via the button "Load flag info" the readout process is started, and the result is entered into the list.
Order of flag information: Steam ID of the owner, player name, flag ID, flag location.
12.1 Context menu “Flags”
In the context menu, the user can teleport to the flag selected from the list, destroy the base (include the flag) or copy the flag information to the clipboard.
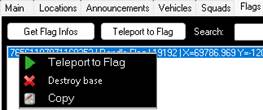
In addition, the selected entry can be copied to the clipboard.
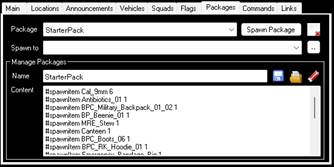
13 Packages Tab
The Packages tab is where spawn packages can be created, saved, and accessed. A spawn package is a collection of game objects or a collection of admin commands that can be created or executed by an administrator.
To create spawn packets, the user must know the correct names of the objects in Scum.
The user can select one of the saved packages via the "Packages" drop-down list.
The content of the selected one is displayed to the user in the "Create/Edit Packages" area.
The user can now add/remove objects in the "Content" field and/or change the number of individual objects.
In contrast to the manual creation of objects, the number is not limited to 10 identical objects per operation. This means that if 15 identical objects are to be created, two entries (once 10 and once 5) do not have to be created here. The total number of 15 can be entered directly.
The
existing package can be saved again via the ![]() button. If the user changes the name of
the package, a new package is created via the
button. If the user changes the name of
the package, a new package is created via the ![]() button.
button.
The Create Package button starts the creation of the objects defined in the selected package in Scum.
If a player has been selected in the “Spawn to” selection field (the "Get Players" command must be selected beforehand), the package will be generated for the selected player.
The
button ![]() permanently deletes the selected package.
permanently deletes the selected package.
The button ![]() opens the selected package file in the Windows
Notepad.
opens the selected package file in the Windows
Notepad.
The
button ![]() clears the two fields "Name" and
"Content".
clears the two fields "Name" and
"Content".
The button ![]() can be used to select a different directory
for packages.
can be used to select a different directory
for packages.
The files used to store packages are stored in the "Packages" subfolder of the program directory. The file extension is: ".pack".
14 Commands Tab
There are numerous admin commands in Scum. In order to have quick access to these commands, the tab " "Commands" is used.
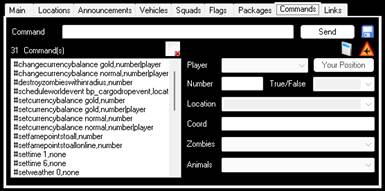
14.1 General
Each command must start with a "hashtag" ("#") to be saved.
The commands are stored in the file "Commands.lst" in the subdirectory "Lists" of the program directory and can also be edited or entered there.
After saving a new command, it is immediately added to the list of available commands.
The
button ![]() deletes the selected command from the list.
deletes the selected command from the list.
The
button ![]() creates an Airdrop on your position.
creates an Airdrop on your position.
The button ![]() calls up the Airdrop Generator (see chapter
Airdrop Generator).
calls up the Airdrop Generator (see chapter
Airdrop Generator).
14.2 Complete commands
Complete commands are commands that can also be executed directly in Scum.
Examples:
·
"#Settime
6" changes the in-game time to 6:00 a.m.)
· "#CancelVote" ends the current vote." BP_Bear2 3" produces (spawns) 3 animals of type BP_Bear2
These commands can also be entered, saved, and executed in the "Command" field.
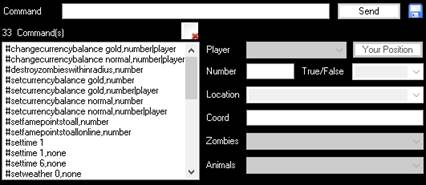
14.3 Incomplete commands
Incomplete commands are basic commands that require at least one additional parameter.
Examples:
·
"#Settime"
still needs a number for the time to be set
·
"#SpawnAnimal" requires the
animal species to be produced and the number
·
"#SetFamePointsToAllOnline"
requires the number of Fame Points
The incomplete commands are commands that must be supplemented by the user with the missing parameters before execution with SAM. For this purpose, corresponding fields are available to the right of the command list.
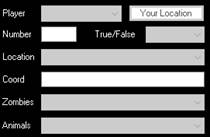
In the "Position" field, the positions stored by the SAM are available to the user to fill the "Coordinates" field.
When selecting an incomplete command from the list, the user is shown which fields/parameters are still missing.
Example: The command
"#SpawnAnimal" also requires the animal species/animal type and the
count.
Since Scum expects the commands with
additional parameters, which are also in a certain order, the order of input is
also considered/checked by the SAM.
If the user selects the number before the animal species in the example shown above, SAM informs the user of the (still) missing parameter.

14.3.1 Configuring incomplete commands
Commands that require additional parameters must be entered as follows in the field "Command", or alternatively directly in the file "Commands.lst".
·
The
main components are separated by commas (without spaces)
·
Order:
Command, Parameter List
·
The
parameter list is in turn represented by a dash (|) separately
·
Possible
parameters: none, Number, Zombie, Animal, Location, Boolean
Examples:
The command "#SpawnAnimal" requires two parameters (Which Animal and the Number).
|
Command |
Parameter
list |
|
#SpawnAnimal |
Animal|Number |
|
Entry
=
#SpawnAnimal,Animal|Number |
|
If only one parameter is required, e.g. for "#SetTime", the separation by means of a high line is omitted.
|
Command |
Parameter list |
|
#SetTime |
Number |
|
Entry
= #SetTime,Number |
|
If
no parameter is required, for example in case of "#CancelVote", the
only parameter entered is "none".
|
Command |
Parameter list |
|
#CancelVote |
none |
|
Entry =
#CancelVote,none |
|
If
no parameter is required, because the command is entered completely with all
necessary parameters, such like "#Settime 2", the only parameter is
also entered as "none".
|
Command |
Parameter list |
|
|
#SetTime 2 |
none |
|
|
Entry =
#SetTime 2,none |
||
Excerpt from the Commands.lst file:
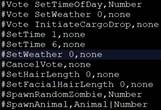
Note: For
full commands, the text "none" is automatically added to them.
14.4 Airdrop Generator
With the Airdrop Generator, the user can create several randomly placed airdrops.

Some information is required for this.
Number of Airdrops: Number of airdrops to be generated.
Latitude and Altitude in
Kilometers: Defines the area in which the airdrops are generated.
Midpoint: Midpoint of the area where the airdrops will be generated.
Starting from the midpoint, the width and height are used to define the area in which the airdrops are to be generated. Width and height must be given in kilometers (one sector edge length = 3 km).
The center point can be entered manually in the Center field. Alternatively, the user's current position on the map can be read out via the "Your Position" button and entered in the "Center" field.
The "Map Teleport" button allows the user to teleport to any location. The user can then read out the new position via the "Your position" button and have it entered in the "Center" field.
The user can generate the airdrops directly via the "Spawn Airdrops" button. Alternatively, a spawn pack can be created to generate the airdrops later.

The resulting package can then be retrieved from the Packages tab.
15 Links Tab
On the "Links" tab, links to frequently used websites and/or files can be stored.
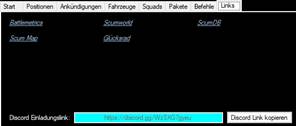
In addition, the user will see the invitation link for Discord set under "Options". This invitation link can be copied to the Windows clipboard for further use via the "Copy Discord Link" button.
The links (max. 21) that are displayed to the user here can be defined via the file "Links.lst" in the subdirectory "Lists" of the program directory.

This is a simple text file that defines a link per line.
The individual components must be separated by a comma (without spaces).
Order: Display text, URL/address, tooltip (text to be displayed when hovering the mouse over the display text).
Internet
addresses, paths to files/folders, and program files can be used as shortcuts.
The file for storing the links/shortcuts is stored
in the "Lists" subfolder of the program directory in the file
Links.lst.
16 Economy Manager
With version v3.5.1 a new economic manager was introduced. For the time being, the previous economic manager will continue to be available.
Hint:
The
generated user lists are not compatible
with the new and the old business manager!
16.1 General
With Scum Update 0.7, a trading system has been introduced in Scum. This system can be comprehensively configured by the server operators (but also in single player mode). In addition to general settings, the server operator can make the following settings for individual trading objects.
·
Prices.
·
Sell
Price.
·
Multipliers
for sales and purchase prices.
·
Activation/deactivation
of the sale.
·
The
number of fame points required for a purchase.
These settings must be entered in the configuration file "EconomyOverride.json" (Json format) on the administration page of the server providers (Gportal, Pingperfect, etc.). These settings must be made for each of the (currently) 7 different merchant types of the (currently) four trading posts.
The Scum Business Manager supports the user in creating the necessary entries for the respective trading objects.
After opening the Scum Economic Manager, the following user interface is displayed.
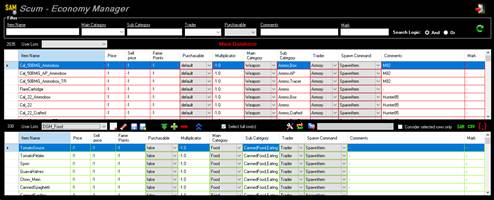
The main database is automatically loaded and displayed at the top of the user interface.
The filter function can be used to reduce the number of data records displayed. For this purpose, among other things, main categories and subcategories are available.
The search logic can be changed by the user. For this purpose, the "And" and the "Or" operators are available.
For the "And" operator, all entered filter entries must apply to a record.
For the "Or" operator, at least one filter input must apply to a record.
In the text fields (object name, subcategory, comment, label) you can also use the prefix "<>" to search for unequal entries.
The search is triggered by pressing the Enter key for the text fields. Exception: When a text field is emptied, the search is executed directly.
This ![]() resets all filter entries and reloads the
"main database".
resets all filter entries and reloads the
"main database".
The main database is stored in the xml subfolder of the program directory in the SAM_Items.xml file. In addition, the files "SAM_MainTags.xml" and "SAM_Trader.xml" (for the selection lists) are stored there. These files are included with SAM and should not be changed!
As an alternative to the main database, a user list can also be loaded into the upper area.
![]()
In this way, the user can also create and maintain his own "main database" and synchronize it with the SAM main database again and again.
The user interface of the Business Manager can be maximized to screen size by double-clicking on the empty/black area.
This ![]() closes
the Economic Manager and displays the SAM main window again.
closes
the Economic Manager and displays the SAM main window again.
16.2 User Lists
In order to document the changes for their own server and to be able to call them up again later for further changes, the user can save unfiltered or filtered data records.
The user list is displayed to the user at the bottom of the user interface.

To create a user list, the user can add
marked records in the table view of the main database to ![]() the user list using the button.
the user list using the button.
The button ![]() can be used to add a new/empty entry to the
user list, e.g. to add an object missing from the main database. The individual
fields are then assigned corresponding default values.
can be used to add a new/empty entry to the
user list, e.g. to add an object missing from the main database. The individual
fields are then assigned corresponding default values.
The button ![]() removes the currently selected row from the
user list.
removes the currently selected row from the
user list.
The button ![]() hides the main database to get a better view
of the user lists table. The button
hides the main database to get a better view
of the user lists table. The button ![]() displays the main database again.
displays the main database again.
With the option "Lines comp. Select", the user can decide whether a mouse click on an entry selects the complete row or only the individual cell (easier editing of the cell value). In both cases, the individual cells can be edited.
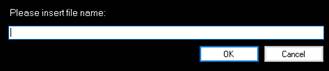
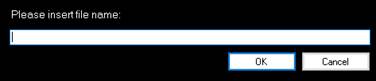
After clicking on the button, a ![]() dialog for entering a file name appears the
first time a user list is saved.
dialog for entering a file name appears the
first time a user list is saved.
The user lists are stored in the subdirectory "xml" of the program directory of the SAM and entered in the selection list "User lists". The files for storing user lists are stored in the "xml" subfolder of the program directory. The file extension is: ".eco".
Existing user lists are loaded via the selection in the "User Lists" selection field.
Unsaved changes to a user list are indicated to the user by the modified icon of the Save button.
![]() ->
user list saved |
->
user list saved | ![]() -> user list changed but not saved.
-> user list changed but not saved.
The button ![]() is used to save an already saved and/or
changed user list under a different name. In this case, the dialog shown above
also appears.
is used to save an already saved and/or
changed user list under a different name. In this case, the dialog shown above
also appears.
An existing user list can be deleted via
the button ![]() . In this case, the saved list in the program
directory is also deleted. To clear the current user list, the button must
. In this case, the saved list in the program
directory is also deleted. To clear the current user list, the button must ![]() be used.
be used.
The button ![]() exports the current user list to a CSV file
(cabinet: desktop of the logged-in user).
exports the current user list to a CSV file
(cabinet: desktop of the logged-in user).
In the event that the names of the objects
in the main database should change on the part of the developers (e.g. as with
Scum Update 0.75), ![]() an existing user list can be updated
accordingly via the button. However, this function can also be used to reset
other values to the default value (from the main database).
an existing user list can be updated
accordingly via the button. However, this function can also be used to reset
other values to the default value (from the main database).
For this purpose, the following fields are available to the user:
16.3 Merge User Lists
With each update/patch of Scum new items can be added. In addition, the user may want to add items to his saved lists later.
The Merge Lists button does just that.
Clicking on the button ![]() activates the adjacent selection field. The
user can add an existing user list to the current user list via the selection
list.
activates the adjacent selection field. The
user can add an existing user list to the current user list via the selection
list.
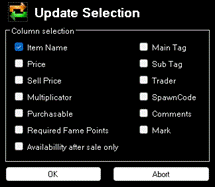
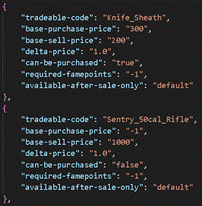
16.4 Eco Tools
To edit the most important entries, the
user lists (not the main database!) can be edited with the Eco Tools. When the
button is pressed, ![]() the following dialog is displayed.
the following dialog is displayed.
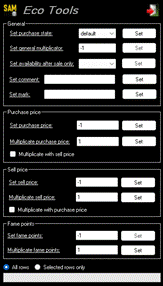
Here the user can edit the following
parameters of all objects of the loaded user list:
|
Designation |
Json Parameter |
Possible values |
Description |
|
Set purchase
state: |
can-be-purchased |
default(=default
value from game), true, false |
Object can be purchased (true) or
not (false). default = game internal default |
|
Set multiplicator |
delta-price |
-1 (=default value from game) or numerical |
Multiplies the selling price and the purchase price |
|
Set
availability after sale only |
available-after-sale-only |
default(=default
value from game), true, false |
The item can only be purchased if it has previously been sold to the trader. |
|
Comment |
none |
String |
User comment |
|
Mark |
none |
String |
User mark |
|
Set purchase price |
base-purchase-price |
-1 (=default value from game) or numerical, or numerically and letter "g" if the price is
to be indicated in gold. |
Purchase price at the trader |
|
Multiplicate
purchase price |
none |
numerical
value (> 0) |
Multiplies the entered purchase price (only if <> "-1" |
|
Multiply by selling price |
none |
yes/no |
Multiplies the purchase
price by the value entered (only if
<> "-1") |
|
Set sell
price |
base-sell-price |
-1 (=default
value from game) or numerical |
Trader’s sell price |
|
Multiplicate sell price |
none |
numerical value (> 0) |
Multiplies the entered sell
price (only if <> "-1" |
|
Multiply by purchase price |
none |
yes/no |
Multiplies the selling price by the value entered (only if <>
"-1") |
|
Fame points |
required-famepoints |
-1 (=default value from game) or numerical |
Necessary number of fame points to be able to buy an
object. |
|
Multiplicate
Fame points |
non |
numerical
value (> 0) |
Multiplies the number
of fame points entered (only if <> "-1") |
After entering/selecting a valid value of the four input fields, the entered values are adopted for the currently loaded user list when the respective "Apply" button is pressed.
When you select the All option, the values in all rows of the loaded user list are changed.
Selecting the Select option changes only the values in the selected rows of the loaded user list.
The "Exit" button closes the Eco Tools dialog.
Note: The user list must be saved manually after editing with the Eco Tools!
16.5 Json Export
Using the button ![]() , the records of the currently loaded user
list are exported into the necessary json format. Optionally, only the selected
columns can be exported via the checkbox "Consider only selected
columns".
, the records of the currently loaded user
list are exported into the necessary json format. Optionally, only the selected
columns can be exported via the checkbox "Consider only selected
columns".
For this purpose, the user is asked to enter a file name.
The export file is stored on the desktop of the registered user and is automatically opened immediately after the export.
The contents of the export file can be copied by the user and pasted to the respective locations in the configuration file "EconomyOverride.json".
To apply the changes to the trading system, a restart of the Scum Server is required.
Hint:
The
content of the Json export must be transferred manually by the user to the
file "EconomyOverride" on the Scum Server!
Alternatively,
the Json Manager ![]() can be called via the button (see chapter Json
Manager).
can be called via the button (see chapter Json
Manager).
17 Json Manager
17.1 General
Version
v3.5.4 introduced Json Manager. The Json Manager can read the complete economy
file (EconomyOverride.json) file and supports the user in transferring the
contents of the user lists into the economy file.
Hint:
To
avoid problems, the main settings within the json file must be at the beginning
of the json files. In case of doubt, the template file
"EconomyOverride.json" from the program subdirectory "xml"
should be used.
In
addition, content from the Economy file can be transferred to an existing or
new user list.
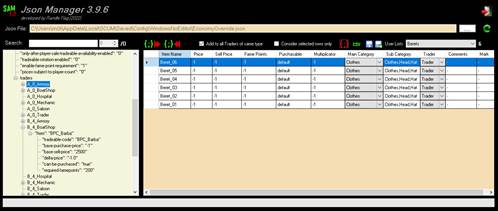
On
the left, the economy file is displayed in a tree view. The user lists created
with the Economy Manager are displayed on the right side in a table view.
The
economy file to be loaded can ![]() be selected and loaded via the button. The
button
be selected and loaded via the button. The
button ![]() reads the Json file again.
reads the Json file again.
The
tree view can be searched using the search box.
![]()
The
number of search results is displayed to the right of the number field. The
number field allows the user to navigate through the search results.
User
lists can be selected and loaded via the "User Lists" selection
field.
Note: User lists created with the
"old" Economy Manager cannot be imported with the Json Manager!
17.2 Economy File
To
add entries to the Economy file, a user list must be loaded. The user can use
the option "only selected lines" to add only the selected entries
from the user list to the economy file. Otherwise, all entries of the user list
will be added to the economy file.
Before
entries from the user list can be added to the Economy file, the user must
select the "Destination". To do this, the respective dealer must be
selected in the tree view. Once this is done, the button becomes ![]() active.
active.
After
pressing the button, the ![]() entries from the user list are transferred. If
entries to be transferred already exist at the selected dealer, the values of
these entries are updated with the values from the user list.
entries from the user list are transferred. If
entries to be transferred already exist at the selected dealer, the values of
these entries are updated with the values from the user list.
To add the userlist
content to all traders of the same type, the user can activate the checkbox.
![]()
17.3 User Lists
To
add entries from the Economy file to a user list, either a merchant or a single
entry must be selected in the tree view. Once this is done, the button becomes ![]() active.
active.
After
pressing the button, the ![]() entries are transferred from the tree view to
the user list. If entries to be transferred already exist in the user list, the
values of these entries are updated with the values from the tree view.
entries are transferred from the tree view to
the user list. If entries to be transferred already exist in the user list, the
values of these entries are updated with the values from the tree view.
Changes
to a user list can ![]() be saved via the button. Unsaved changes to a
user list are indicated to the user by the modified icon of the Save button.
be saved via the button. Unsaved changes to a
user list are indicated to the user by the modified icon of the Save button.
![]() -> user list saved |
-> user list saved | ![]() -> user list changed but not saved.
-> user list changed but not saved.
The
button ![]() is used to save an already saved and/or
changed user list under a different name. In this case, the dialog shown above
also appears.
is used to save an already saved and/or
changed user list under a different name. In this case, the dialog shown above
also appears.
It
is not possible to manually change individual values of a user list
within the Json Manager . For this
purpose, the economic manager must be used
17.4 Export
Using
the button ![]() , the records of the currently loaded user
list are exported into the necessary json format. Optionally, only the selected
columns can be exported via the checkbox "Consider only selected
columns".
, the records of the currently loaded user
list are exported into the necessary json format. Optionally, only the selected
columns can be exported via the checkbox "Consider only selected
columns".
Before exporting, a copy of the current Economy file is created (currently). This receives the current date as a prefix (e.g. 230325 for 25.03.2023). If the current economy file is exported again, this file will be overwritten.
Note: It is recommended to work only with a copy of the original Economy file and to check the result before copying to the Scum Server!
In
addition, ![]() the button can be used to export the current
user list to a CSV file (storage: desktop of the logged-in user).
the button can be used to export the current
user list to a CSV file (storage: desktop of the logged-in user).
17.5 Tree View – Context Menu
Depending on the element selected in the tree view, the entries in the context menu are activated.
17.5.1 Edit Value
Changes the value of the selected item. Active only for elements without sub-elements.

17.5.2  Delete Node
Deletes the selected item. Is only active for direct sub-entries (items) of dealers.
17.5.3 Delete all Sub Nodes
Deletes all subentries of the selected item.
Is only active when a trader has been selected.
17.5.4 Expand Nodes
Expands the selected structure object (expanding node.).
17.5.5 Collapse Nodes
Collapses
the selected structure object (closes node).
18 Log File Viewer
18.1 General
With version v3.3.8 the Log File Viewer has been released. The Log File Viewer is used to facilitate the viewing and reading of log files (log files) from SCUM servers. The log files can be read folder by folder.
To do this, the
user must first download the log files from his SCUM server and store them in a
directory (without subdirectories). See chapter Log File Downloader.
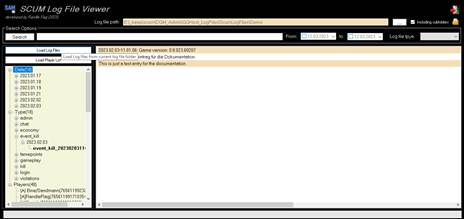
In contrast to the other user interfaces of SAM, the user interface of the Log File Viewer can be maximized (better readability of long log entries). To do this, double-click on the free black area in the upper area. Double-clicking again reduces the size of the user interface back to the default size.
18.2 Read Log Files
When starting the
Log File Viewer for the first time, the user must ![]() select the directory with the log files via
the button. This selection is saved across sessions.
select the directory with the log files via
the button. This selection is saved across sessions.
Pressing the "Open directory" button opens the selected directory in Windows Explorer
.
Using the
"Read log files" function, the log files are read in and listed in a
tree structure on the left side. If a directory has already been selected in a
previous session, it is automatically read in when the program starts.
Log files from the subdirectories of the selected directory (main directory) are also considered via the option "incl. subfolders".
There are two views of the log files: Type -> Date and Date -> Type
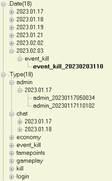
For
better sorting across month boundaries, the date is given as year – month – day
(YYYY. MM.DD). Since version v3.4.4, in addition to the entry Date and Type,
the total number (not emptier!) Log files.
18.2.1 Context menu – Structure view
There are four entries in the context menu of the tree view for the log files. Whether these entries are enabled depends on the selected item.
18.2.1.1 Open File
Opens the selected log file in the text editor (default program is defined in Windows).
18.2.1.2 Copy File
Copies the selected log file to the clipboard.
18.2.1.3
 Copy Name
Copies the name of the selected log file to the clipboard.
18.2.1.4 Expand Nodes
Expands the selected tree node.
18.2.1.5 Collapse Nodes
Collapses the selected tree node.
18.3 View Log File Content
By double-clicking on one of the log file entries, the content of the selected log file is displayed.

Note:
For privacy reasons, no authentic entries are shown here!
18.3.1 Context menu – Content view
There are two entries in the context menu of the content display. Whether these entries are enabled depends on the selected item.
18.3.1.1
 Copy
Copy
Copies the selected row to the Clipboard.
18.3.1.2 Copy All
Copies all content to the clipboard.
18.3.1.3 Teleport to
For the log file types login, kill, gameplay and vehicle destruction the user can teleport to coordinates from the log file entry (if it contains coordinates.
![]()
For example, possible
coordinates from an entry from a kill log file.
18.3.1.4 Hide/Show Log File Tree
Shows or hides the tree view for the log files.
18.4 Search in Log Files
The contents of the log files can be searched. To do this, the user can enter any text in the search field (upper and lower case is not considered) and start the search with the Enter key or via the "Search" button.
![]()
The search result is then displayed in the tree view in a new/separate node.
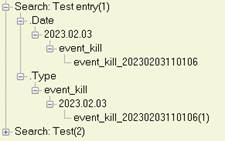
In the following
example, a hit was found when searching for the string "Test entry".
I.e. the searched string was found in a
log file.
The user can therefore perform several searches during one session. However, these searches are not stored permanently (across sessions)!
The user can now display the content by double-clicking on one of the log files.
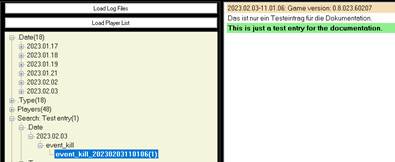
The lines in
which the string you are looking for was found are then highlighted within the
content display. In addition, the number of hits in the text of the selected
node is displayed in the tree view.
18.4.1 Search filter
In addition, the user can further narrow his search by specifying a date, a period and/or the type of log files to be searched. This not only reduces the number of hits by possibly irrelevant entries, but also shortens the duration of the search.
Hint:
When analyzing log files, as well as when searching for log files/entries, it must be taken into account that log files with the date day x can also contain log entries with the date day x +1 (e.g. entries with the date 2.1.2023 may also exist in a log file with the date 1.1.2023).
Depending on the
server location, there may also be corresponding time differences.
18.4.2 Date
If the user only wants to search log files of a specific date, he can select this date in the date picker "From". By selecting the checkbox, the check box is automatically set and thus taken into account in the search.
![]()
18.4.3 Period
If the user only wants to search log files of a certain period of time, he can select the start date in the date picker "From" and the end date in the date picker "To". The selection automatically sets the hooks (checkboxes) and thus takes them into account in the search.
![]()
18.4.4 Log File Type
If the user only wants to search log files of a certain type, he can achieve this by selecting the corresponding selection in the "Log file type" field.
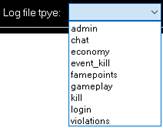
Hint: Only the log file types that exist in the selected directory are listed in the selection list.
19 Tools
19.1 Log File Downloader
19.1.1 General
With version 3.3.9 of SAM a tool (name: "GetScumLogFileFromFTP.exe") for downloading the Scum Log files from the Scum Server is delivered. The prerequisite is that the server provider allows the download of the log files via FTP and the user has the necessary/valid access data.
Hint:
No access data (FTP address, username or password)
will be stored permanently!
This data is only required during runtime.
The input is made by the user, either interactively or via command line.
The tool is placed in the Tools subdirectory of the SAM program directory.
Example:
c:\Users\USERNAME\AppData\Local\Programs\ScumAdminManager\Tools\LogFileDownloader
19.1.2 Call (interactive)
GetScumLogFileFromFTP can be called by double-clicking. In this case, the user must enter all data manually (with each call!).
Call (command
line)
GetScumLogFileFromFTP can also be called from command line.
The call can be entered directly into a console. In this case, the complete path to the program "GetScumLogFileFromFTP" must either be specified, or the console must be started out of the program directory.
In the following examples, the program GetScumLogFileFromFTP is located in the C:\temp\demo\ directory.
Examplese:
Console started
from "C:\temp\Demo" (program directory of "GetScumLogFileFromFTP"):
![]()
Console started from “C:\Users”:
![]()
Alternatively, the call can also be entered in a text file and saved with the extension ".cmd" or ".bat". In this case, the download of the log files can be started in the future simply by double-clicking.
Examples:
Storage of the "text file" in the program directory of "GetScumLogFileFromFTP":
![]()
Do not store the "text file" in the program directory of "GetScumLogFileFromFTP":
![]()
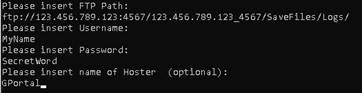
19.1.3 SFTP
If the FTP access of the hoster requires the SFTP protocol or is to be used, the entry of the variable Path must be adjusted. In this case, the variable value must not start with ftp:// .
Example of access via SFTP:
![]()
Hints:
In all cases, the names of the parameters (e.g.
"path=") must be passed/entered!
The process can also be automated very well via the command line call (e.g. via the Windows Task Scheduler). For example, the program could be executed time- or event-driven (e.g. every 6 hours or at/after login).
19.1.4 Storage of log files
Regardless of the call, a directory with the name "ScumLogFiles" is created in the directory of the program "GetScumLogFileFromFTP":, if it does not already exist.
If the parameter "host" was passed with content, a subdirectory with the value of the parameter "host" is created in the directory "ScumLogFiles" (e.g. "ScumLogFiles\GPortal").
At the lowest directory level (either ScumLogFiles or ScumLogFiles\host), a directory is created for each month.
The naming of
these directories is done before the actual download of the log files are read
from these and follow the pattern: two-digit year and month (e.g.
"2301" for the month of January 2023).